In this article, I want to take you through the steps on how to use Cloudflare DNS-over-HTTPS (or abbreviated as DoH) with your Pi-Hole installation.
Pi-Hole is a network-level ad and internet tracker blocking application that acts as a DNS blackhole. It blocks all those pesky advertisements and trackers to keep your privacy a bit more secure.
But what about keeping your DNS private? By default, DNS requests are sent in plain text. This means that a malicious actor can look at all DNS requests you are making. But they can also tamper with the responses.
DNS-over-HTTPS prevents this by using standard HTTPS requests to retrieve DNS information. So the connection from your Pi-Hole to the DNS server is secure. However, keep in mind that the upstream DNS-over-HTTPS provider (in this case Cloudflare) will still have this ability since they hold the
Installing cloudflared to use DNS-over-HTTPS
When Cloudflare released their DNS service 1.1.1.1, they also implemented DNS-over-HTTPS functionality into the tool cloudflared.
Since I installed Pi-Hole on a Raspberry Pi 3B, I’ll be using the ARM binary. You can find binaries for other platforms on Cloudflare’s Github release page.
So open up a terminal and download the precompiles binary. Once downloaded and uncompressed, move it to the /usr/local/bin directory.
$ wget https://bin.equinox.io/c/VdrWdbjqyF/cloudflared-stable-linux-arm.tgz
$ tar -xvzf cloudflared-stable-linux-arm.tgz
$ sudo cp ./cloudflared /usr/local/bin
$ sudo chmod +x /usr/local/bin/cloudflared
Configuring cloudflared
To configure cloudflared and use DNS-over-HTTPS, start off by creating a cloudflared user to run the daemon. Next, create a configuration file and copy the content below.
$ sudo useradd -s /usr/sbin/nologin -r -M cloudflared
$ sudo vim /etc/default/cloudflared

# Commandline args for cloudflared, using Cloudflare DNS
CLOUDFLARED_OPTS=--port 5053 --upstream https://1.1.1.1/dns-query --upstream https://1.0.0.1/dns-query
Update the permissions for the configuration file and cloudflared binary so our daemon user can access them.
$ sudo chown cloudflared:cloudflared /etc/default/cloudflared
$ sudo chown cloudflared:cloudflared /usr/local/bin/cloudflared
Then create the systemd script by copying the content below into /etc/systemd/system/cloudflared.service .
$ sudo vim /etc/systemd/system/cloudflared.service

[Unit]
Description=cloudflared DNS over HTTPS proxy
After=syslog.target network-online.target

[Service]
Type=simple
User=cloudflared
EnvironmentFile=/etc/default/cloudflared
ExecStart=/usr/local/bin/cloudflared proxy-dns $CLOUDFLARED_OPTS
Restart=on-failure
RestartSec=10
KillMode=process

[Install]
WantedBy=multi-user.target
Enable the service to run on startup, then start the service and check the status:
$ sudo systemctl enable cloudflared
$ sudo systemctl start cloudflared
$ sudo systemctl status cloudflared
Configure Pi-Hole to use DNS-over-HTTPS
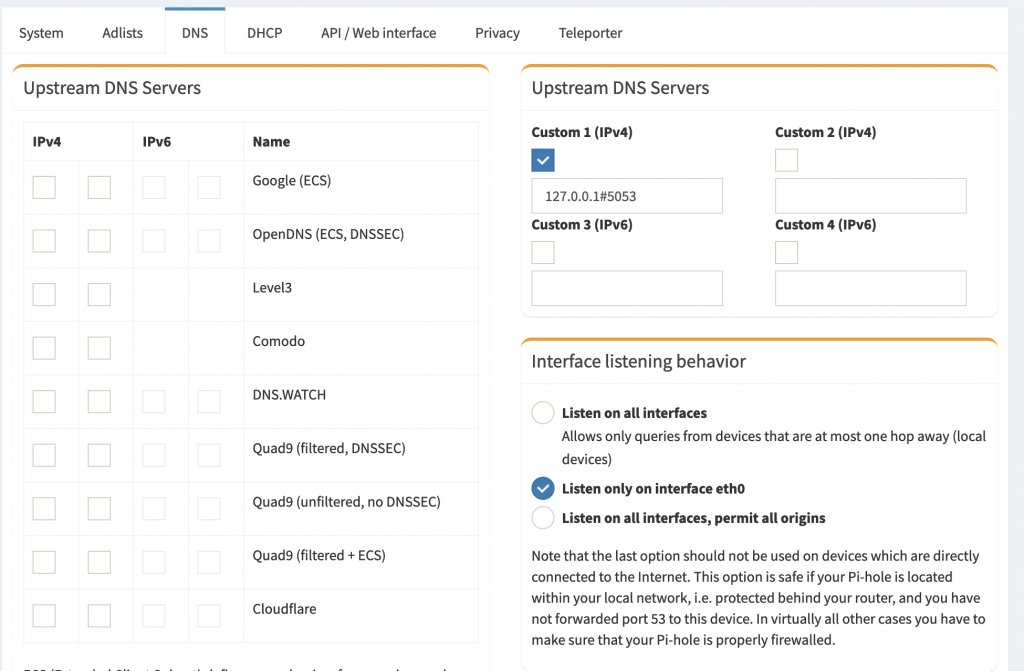
Now that cloudflared is fully configured and you are ready to use DNS-over-HTTPS, go to the admin settings and choose the DNS tab. Specify the local cloudflared service as the upstream DNS server by using 127.0.0.1#5053 as the Custom DNS server (IPv4)
Updating cloudflared
To update cloudflared, you’ll have to stop the current daemon and reproduce the steps of downloading and moving the binary to the correct place and assign the proper access rights again.
You can automate this process by adding the steps to a script that you then execute through cron.
So create a script a /etc/cron.weekly/cloudflared-updater for weekly updates with the following content:
$ sudo vim /etc/cron.weekly/cloudflared-updater

wget https://bin.equinox.io/c/VdrWdbjqyF/cloudflared-stable-linux-arm.tgz
tar -xvzf cloudflared-stable-linux-arm.tgz
sudo systemctl stop cloudflared
sudo mv ./cloudflared /usr/local/bin
sudo chmod +x /usr/local/bin/cloudflared
sudo chown cloudflared:cloudflared /usr/local/bin/cloudflared
sudo systemctl start cloudflared
rm cloudflared-stable-linux-arm.tgz
The last step is to make the update script and assign the proper user right.
$ sudo chmod +x /etc/cron.weekly/cloudflared-updater
$ sudo chown root:root /etc/cron.weekly/cloudflared-updater